Create custom pages for your event website to provide additional information and enhance the visitor experience.
Why Create Custom Pages?
Custom pages allow you to:
-
Share detailed event information
-
Provide FAQs and help resources
-
Display sponsor(s) information
- Links to resources
-
Create a schedule or agenda page
-
Add terms and conditions
-
Showcase speakers or performers
-
Create a photo gallery or add video(s)
-
Add maps and directions
- Any page for any purpose
Step 1: Access Pages Management
From your event dashboard, navigate to Site Builder→ Pages in the main menu.
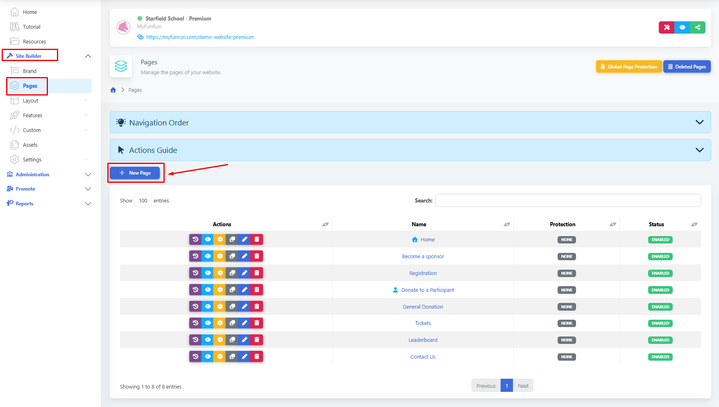
Step 2: Click 'New Page'
Click the '+ New Page' button to start creating your page.
Step 3: Set Page Properties
Configure the basic settings for your page:
-
Page Title: The name of your page (e.g., 'About', 'Schedule', 'Sponsors', 'FAQ')
-
URL Slug: The URL-friendly version of your page name (auto-generated but can be customised)
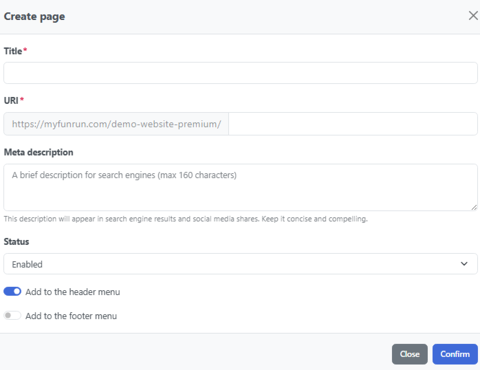
Click to confirm.
Step 4: Add Page Content
Use the page editor to add content to your page. You have several options:
-
Rich Text Editor: Use the TintMCE editor to format text, add images, and create links
-
Block/Section Builder: Add pre-designed sections and blocks (see 'How to Add Sections and Blocks to Pages')
Step 5: Configure Page Settings
Set additional options for your page:
-
Visibility: Choose who can view this page (public, registered users, or password)
-
Menu Placement: Add the page to your navigation menu
-
Meta Description: Add a description for search engines (SEO)
-
Featured Image: Set a banner or header image
Step 6: Set Navigation
Determine how participants access your page:
-
Add the page to the main navigation menu
-
Set the menu order by dragging pages in the pages list
-
Create dropdown menus by making pages subpages of others
-
Add footer links if needed
Step 7: Preview Your Page
Before publishing, use the preview function to see how your page will appear to visitors. Check:
-
Content displays correctly
-
Images load properly
-
Links work as expected
-
Mobile responsiveness
-
Navigation functions correctly
Managing Your Pages
After creating pages, you can:
-
Edit: Update content at any time
-
Duplicate: Create copies of pages with a similar structure
-
Reorder: Change the order that pages appear in navigation
-
Archive: Hide pages without deleting them
-
Delete: Permanently remove pages you no longer need
Page Tips
Common page templates you might want to create:
-
About: Event background, mission, and organiser information
-
Schedule: Event timeline, sessions, and activities
- Sponsors: Showcase your event sponsors with logos and descriptions
-
FAQ: Frequently asked questions and answers
-
Venue: Location details, maps, parking information
-
Contact: Contact form and organiser contact information
-
Terms: Terms and conditions, privacy policy, refund policy
Add Images and Media
Enhance your page with visual content:
-
Click the image icon to upload photos
-
Embed videos from YouTube or Vimeo
-
Add photo galleries or carousels
-
Include PDF downloads or documents
Best Practices
-
Keep page titles short and descriptive
-
Use clear navigation that's easy to understand
-
Optimise images for the web to ensure fast loading
-
Use headings (H2, H3) to structure content for readability
-
Keep important information 'above the fold'
-
Include a clear call-to-action on each page
-
Test all links before publishing
-
Ensure content is mobile-friendly
-
Update pages regularly to keep information current
-
Use consistent branding and styling across all pages
SEO Tips
-
Write descriptive page titles (50-60 characters)
-
Add meta descriptions (150-160 characters)
-
Use descriptive URLs (avoid generic slugs like 'page-1')
-
Include relevant keywords naturally in your content
-
Add alt text to all images
-
Create internal links between related pages